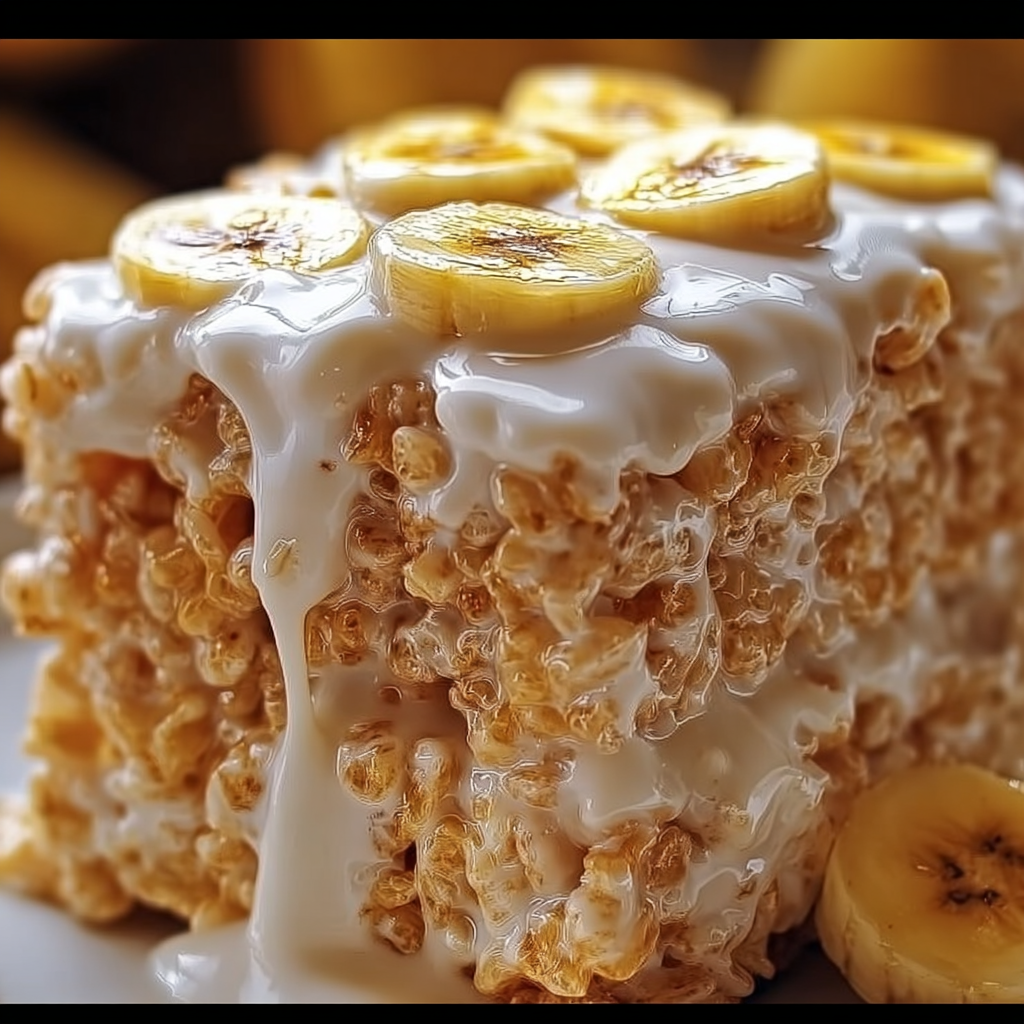
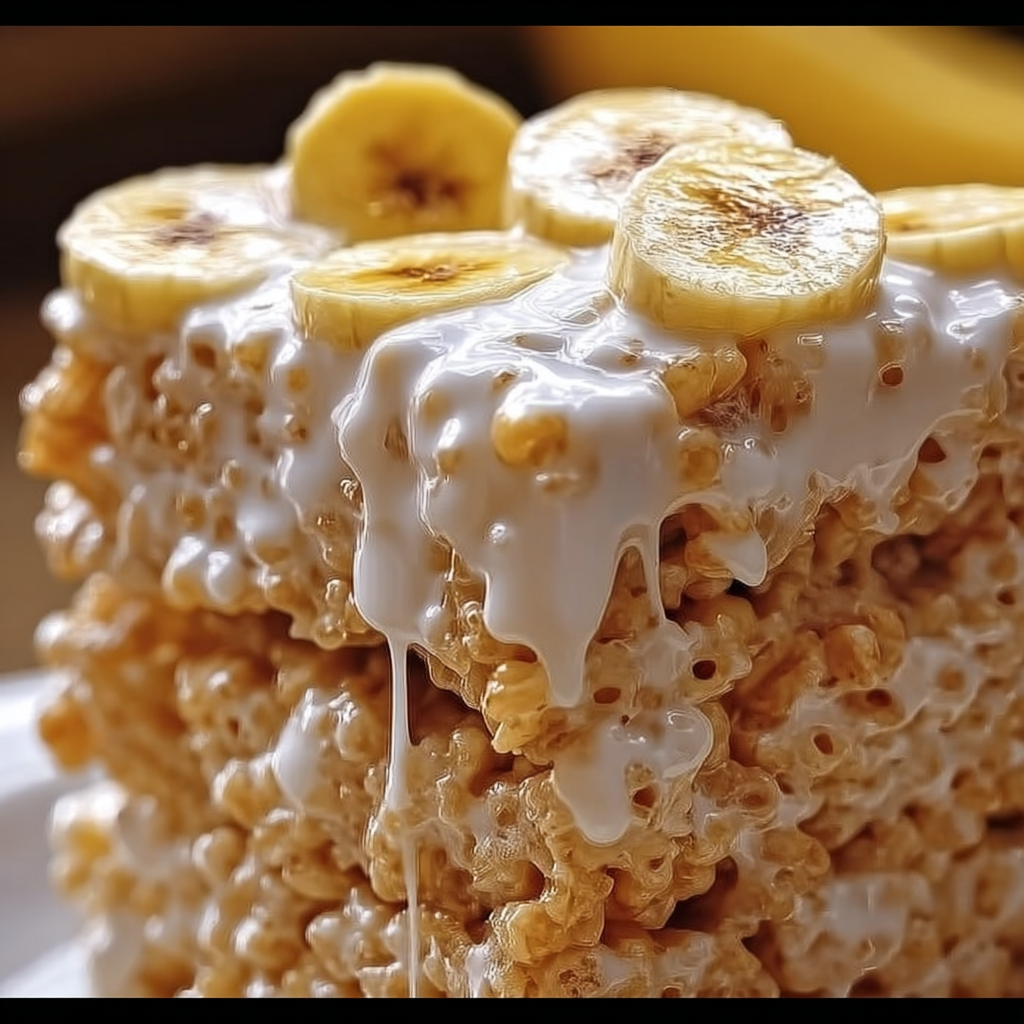
There’s something absolutely magical about a dessert that bridges the gap between childhood nostalgia and grown-up sophistication, and these Banana Pudding Rice Krispies do exactly that in the most delightful way possible. This recipe was born from one of those inspired moments when I was staring at leftover Rice Krispies cereal and a box of banana pudding mix, wondering if I could somehow combine the gooey, marshmallowy joy of crispy treats with the creamy, Southern comfort of traditional banana pudding. After several delicious experiments in my kitchen, I discovered that the magic happens when you layer these beloved flavors rather than just mixing them together—creating a dessert that’s both familiar and completely unexpected, with each bite delivering the perfect combination of crispy, creamy, fruity, and sweet.
Why You’ll Love These Banana Pudding Rice Krispies
- No-bake summer perfection – Perfect for hot days when turning on the oven feels impossible
- Fun for every generation – Kids love the gooey marshmallow step, adults appreciate the nostalgic flavors
- Make-ahead party solution – Prepare in advance for stress-free entertaining
- Customizable creativity – Add your own twists with different toppings and mix-ins
- Perfect portion control – Cut into squares for easy serving and portion management
- Unique conversation starter – Everyone will want to know how you came up with this brilliant combination
Ingredients You’ll Need
For the Rice Krispies Base:
- 3 tablespoons unsalted butter – Adds richness and helps melt marshmallows smoothly
- 10 oz mini marshmallows – The classic gooey foundation for perfect texture
- 6 cups Rice Krispies cereal – Light, crispy perfection for soaking up marshmallow goodness
For the Banana Pudding Layer:
- 1 package instant banana pudding mix – Brings authentic banana flavor without fuss
- 2 cups cold milk – Creates the perfect pudding consistency
- 2 ripe bananas, sliced – Adds natural sweetness and fresh fruit texture
For the Topping:
- 1 cup whipped cream or whipped topping – Creates fluffy, cloud-like finish
- 2-3 tablespoons honey – Beautiful golden drizzle for elegant presentation
Optional Garnishes:
- Crushed vanilla wafers – Extra crunch and traditional banana pudding flavor
- Cinnamon dusting – Warm spice that complements bananas perfectly
- Chocolate shavings – Indulgent finishing touch
Step-by-Step Instructions
Make the Rice Krispies Base:
Step 1: Melt the Foundation In a large saucepan over low heat, melt 3 tablespoons butter until completely liquid and fragrant. Add mini marshmallows and stir continuously until they’re completely dissolved and beautifully gooey. Remove from heat immediately.
Step 2: Create the Base Add Rice Krispies cereal to the melted marshmallow mixture, stirring until every piece is evenly coated in the sticky sweetness.
Step 3: Press and Cool Using a buttered spatula or lightly dampened hands, press the mixture firmly into a greased 9×13 inch baking pan, creating an even layer. Let cool completely while you prepare the other components.
Prepare the Banana Pudding Layer:
Step 4: Mix the Pudding In a medium mixing bowl, whisk together instant banana pudding mix and cold milk vigorously for 2-3 minutes until thick and smooth. Let sit for a few minutes to set fully.
Step 5: Layer the Pudding Once the Rice Krispies base has cooled completely, spread the thickened banana pudding evenly over the surface, reaching all corners.
Add Fresh Elements:
Step 6: Arrange the Bananas Peel and slice two ripe bananas into thin rounds. Arrange the slices over the pudding layer, covering most of the surface for beautiful presentation and fresh fruit flavor.
Step 7: Top with Cream Spread whipped cream generously over the banana slices, creating a fluffy, cloud-like top layer that completes the dessert.
Final Touches:
Step 8: Drizzle and Chill Just before serving, drizzle honey in decorative patterns over the whipped cream. Refrigerate for at least 2 hours to set all layers properly.
Step 9: Cut and Serve Using a sharp knife, cut into squares and serve chilled for the best texture and flavor experience.
Serving Suggestions and Pairings
Perfect Occasion Options This versatile dessert works beautifully for various settings:
- Summer barbecues – Cool, refreshing, and crowd-pleasing
- Birthday parties – Unique alternative to traditional cake
- Potluck gatherings – Easy to transport and serve
- Family reunions – Nostalgic flavors that appeal to all ages
Presentation Ideas Serve on chilled plates with additional banana slices and a sprinkle of crushed vanilla wafers for extra elegance and crunch.
Make-Ahead Tips
Perfect for Planning This dessert is incredibly make-ahead friendly, actually improving in flavor:
Component Preparation Prepare the Rice Krispies base and pudding layer up to 24 hours ahead. Add bananas, whipped cream, and honey just before serving for best appearance.
Full Assembly The complete dessert can be assembled and chilled overnight, though the bananas may darken slightly. Brush banana slices with lemon juice to prevent browning.
Storage Success Cover tightly with plastic wrap and refrigerate for up to 3 days, though it’s best enjoyed within 48 hours for optimal texture.
Storage and Leftovers
Keeping It Fresh Store covered in the refrigerator for up to 3 days. The Rice Krispies base may soften slightly but remains delicious.
Portion Control Cut into individual squares and store in airtight containers for grab-and-go treats throughout the week.
Texture Maintenance While the whipped cream may soften over time, the core flavors remain excellent and many people actually prefer the mellowed texture after a day.
Custom Variations and Add-Ons
1. Peanut Butter Twist Add 2-3 tablespoons peanut butter to the marshmallow mixture for nutty richness that pairs perfectly with banana.
2. Chocolate Banana Version Use chocolate pudding instead of banana for decadent chocolate-banana flavor combination.
3. Tropical Fusion Layer in pineapple chunks or mango slices along with bananas for exotic fruit medley.
4. Crunchy Enhancement Sprinkle granola, chopped nuts, or crushed cookies over the whipped cream for added texture variety.
5. Caramel Drizzle Replace honey with warm caramel sauce for extra indulgent sweetness.
Nutrition Information
Per serving (based on 12 servings):
- Calories: ~230
- Fat: 8g
- Carbohydrates: 35g
- Sugar: 18g
- Protein: 2g
- Fiber: 1g
Banana Pudding Rice Krispies FAQs
Can I make this gluten-free? Yes! Use certified gluten-free Rice Krispies cereal and check that your pudding mix is gluten-free. Most instant pudding mixes are naturally gluten-free.
Can I use non-dairy milk? Test carefully, as some instant pudding mixes require dairy milk to set properly. Whole milk alternatives like oat or soy milk work best.
How do I prevent bananas from browning? Toss banana slices lightly in fresh lemon juice before layering, or add them just before serving for the freshest appearance.
Can I freeze this dessert? The Rice Krispies base freezes well alone, but the complete dessert doesn’t freeze successfully due to the pudding and whipped cream textures.
What if my pudding doesn’t thicken? Make sure you’re using cold milk and whisking vigorously for the full 2-3 minutes. Let it sit longer if needed—it continues thickening as it rests.
Final Thoughts: Share the Love!
These Banana Pudding Rice Krispies prove that the most memorable desserts often come from combining beloved classics in unexpected ways. They take everything wonderful about crispy marshmallow treats and everything comforting about banana pudding, then bring them together in perfect harmony that’s somehow even better than either one alone. Whether you’re surprising kids with a fun new treat, impressing adults with creative nostalgia, or simply indulging in something uniquely delicious, this dessert delivers joy, comfort, and pure happiness in every perfectly layered bite. Get ready for surprised faces, satisfied smiles, and requests to make this incredible creation again and again!